
A stem and leaf plot in Excel displays data by separating it into stems (leading digits) and leaves (trailing digits). It provides a visual representation of the data distribution.
A stem and leaf plot in Excel offers a simple yet effective way to understand data patterns and distribution. By organizing values into stems and leaves, it allows for quick analysis of data trends. We will explore how to create a stem and leaf plot in Excel and interpret the results effectively.
Whether you are a data analyst, student, or researcher, mastering this visual representation technique can enhance your data analysis skills and insights. Let’s dive into the step-by-step process of creating a stem and leaf plot in Excel and unlock the power of data visualization.
Creating A Stem And Leaf Plot In Excel
Creating a Stem and Leaf Plot in Excel
Preparing The Data
Firstly, organize the data that you want to represent in the stem and leaf plot. Ensure that the data is numerical and does not contain any non-numeric values. If necessary, round the data to the appropriate place value to simplify the representation.
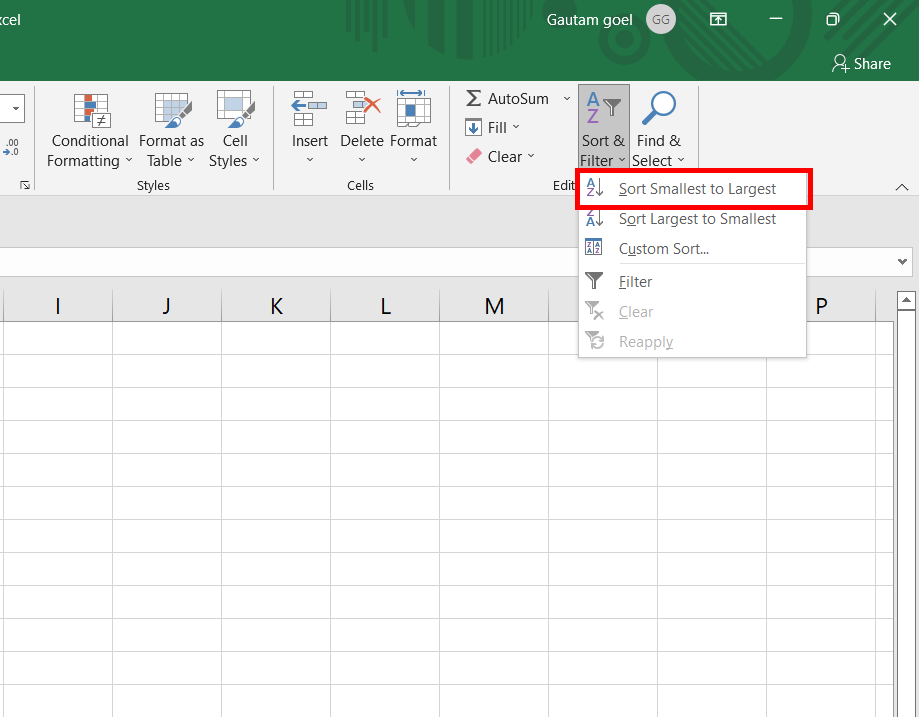
Sorting The Data
Arrange the data in ascending or descending order. This step is essential to accurately build the stem and leaf plot and allows for easier interpretation.
Creating The Stem And Leaf Plot
Utilize Excel to construct the stem and leaf plot. Begin by selecting an empty area in the worksheet as the location for the plot. Then, follow these steps:
- Enter the stems in one column, organized in ascending order.
- Adjacent to each stem, enter the leaves corresponding to that stem, aligned in rows. Align the leaves to the right of the respective stems by utilizing cell formatting options.

Credit: www.statology.org
Customizing The Stem And Leaf Plot
Customizing the Stem and Leaf Plot allows you to enhance the visual appeal and clarity of the data representation.
Changing The Appearance Of The Plot
To modify the appearance of the stem and leaf plot in Excel:
- Adjust the font size and style to make the plot more legible
- Change the color scheme to highlight specific data points
- Modify the axis scales to focus on relevant ranges
Adding Labels And Titles
Ensuring clear labels and titles can provide context to the plot:
- Include a descriptive title to summarize the data being displayed
- Add axis labels to indicate the range and categories represented
- Incorporate a legend if utilizing multiple datasets for better understanding
By customizing the stem and leaf plot in Excel, you can present your data effectively and engage your audience.
Interpreting A Stem And Leaf Plot
Learn how to interpret a stem and leaf plot using Excel. This handy tool allows you to visualize and analyze data, making it easier to discern patterns and trends in your data set. Increase your data analysis skills with stem and leaf plots in Excel.
Interpreting a Stem and Leaf Plot
Identifying key data points
A stem and leaf plot in Excel visually represents data distribution at a glance.Identifying key data points helps in understanding trends easily.Analyzing the stem and leaf plot reveals distribution patterns. Each digit in the stem represents a group, aiding in spotting outliers.

Credit: www.qimacros.com
Comparing Stem And Leaf Plot With Other Graphs
When it comes to analyzing and presenting data, there are several types of graphs and charts that can be used in Excel. One of the most unique and valuable tools for visualizing data is the stem and leaf plot. In this section, we will compare the stem and leaf plot with other common graphs and explore the advantages of using this method to display data in Excel.
Advantages Of Stem And Leaf Plot Over Other Graphs
The stem and leaf plot offers several advantages over other types of graphs, making it a powerful tool for data analysis in Excel.
- Displaying individual data points: Unlike a histogram or bar chart, the stem and leaf plot allows for the display of individual data points, making it easier to see the distribution of the data.
- Preserves original data: The stem and leaf plot preserves the original data, providing a clear and accurate representation of the dataset without the need for data manipulation.
- Easy to interpret: The stem and leaf plot is easy to interpret, providing a clear visual representation of the data distribution without the need for complex calculations.
- Quick identification of outliers: This method allows for the quick identification of outliers and patterns within the dataset.
When comparing the stem and leaf plot with other types of graphs, it becomes evident that there are specific advantages to using this method to visualize data in Excel.
- Histogram: While histograms are useful for visualizing the distribution of data, they can obscure individual data points and do not provide the same level of detail as a stem and leaf plot.
- Bar Chart: Bar charts are effective for comparing discrete categories, but they do not offer the same level of detail as a stem and leaf plot, particularly when dealing with numerical data.
- Box Plot: Box plots are excellent for displaying the distribution of data and identifying outliers, but they may not provide the same level of detail as a stem and leaf plot when it comes to individual data points.
Credit: www.geeksforgeeks.org
Frequently Asked Questions On Stem And Leaf Plot In Excel
How Do You Make A Stem And Leaf Plot In Excel?
To create a stem and leaf plot in Excel, follow these steps: 1. Enter your data in two columns: one for stems and one for leaves. 2. Highlight the data and click on the “Insert” tab. 3. Choose the “Bar” chart and select the first option called “Clustered Bar.
” 4. Customize the chart by adding titles, labels, and other details. 5. Your stem and leaf plot will now be displayed in Excel.
How Do You Make A Stem And Leaf Chart?
To make a stem and leaf chart, organize data by separating each number into stems (tens digit) and leaves (ones digit). Create the stem column by listing the stems, and for each stem, write the corresponding leaves. Label the key and title the chart.
How Do You Insert A Back-to-back Stem And Leaf Plot In Excel?
To insert a back-to-back stem and leaf plot in Excel, use the STATISTICS add-in. Click on Insert > Recommended Charts > All Charts > Histogram > OK. Select the stems and leaves, go to Chart Tools > Design > Select Data, and input the data for both plots.
How Do You Find The Stem And Leaf Plot Mode?
To find the mode in a stem and leaf plot, look for the stem with the highest frequency count.
Conclusion
To sum up, creating a stem and leaf plot in Excel is a valuable tool for organizing and visualizing data. It offers a clear and insightful way to represent numerical information. By following the steps outlined in this post, you can efficiently utilize Excel to construct stem and leaf plots, enhancing your data analysis skills.