To remove time from date in Excel, use the ‘Text to Columns’ feature under ‘Data’ tab. When working in Excel, separating date and time values can be crucial for data analysis and reporting.
This simple process helps to clean up your data and make it more user-friendly. By following the steps to remove time from date in Excel, you can easily manipulate and format your data according to your needs. Whether you’re a beginner or a seasoned Excel user, understanding how to parse date and time information is a valuable skill.
This article will guide you through the steps to efficiently remove time from date in Excel, allowing you to better manage your data for various tasks and projects.

Credit: www.geeksforgeeks.org
Using The Text Function
In this section, we will explore how to remove time from a date in Excel using the TEXT function. This function allows you to display a date in a specific format, making it handy when you need to extract only the date portion from a date-time value.
Syntax Of The Text Function
The TEXT function in Excel has a simple syntax:
=TEXT(value, format_text)
Where:
- value: The date or time value you want to format.
- format_text: The format you want to apply to the value. For instance, to display only the date, you would use “mm/dd/yyyy” for the US date format or “dd/mm/yyyy” for the UK date format.
Example Of Using The Text Function
Let’s say we have a date-time value in cell A1 and we want to extract just the date. We can use the TEXT function as follows:
| Cell A1 (Date-Time Value) | Cell B1 (Extracted Date) |
|---|---|
| 2022-05-15 09:30:00 | =TEXT(A1, “mm/dd/yyyy”) |
In this example, the formula in B1 will extract the date from A1 and display it in the desired format.
Credit: exceljet.net
Using The Day, Month, And Year Functions
When working with dates in Excel, it’s common to need to remove the time portion to focus solely on the date. By utilizing the DAY, MONTH, and YEAR functions, you can easily extract specific date components.
Extracting The Day From A Date
To extract the day from a date in Excel, you can utilize the =DAY function. This function retrieves the day component from a given date value. Simply input the date you want to extract the day from within the parentheses of the function.
Extracting The Month From A Date
Extracting the month from a date is straightforward with the =MONTH function. This function allows you to isolate the month component from a date in Excel. Input the date you wish to extract the month from to obtain the desired result.
Extracting The Year From A Date
Similar to extracting the day and month, removing the year component from a date can be done using the =YEAR function. This function enables you to extract the year value from a given date input. Simply specify the date from which you want to extract the year.
Using The Date Function
To remove time from a date in Excel, you can utilize the DATE function, allowing you to extract only the date portion and disregard the time value.
Syntax Of The Date Function
The syntax of the DATE function is =DATE(year,month,day), where you specify the year, month, and day values to create a date.
Example Of Using The Date Function
Example:
| Formula | Result |
|---|---|
| =DATE(2022,5,15) | 15-May-2022 |
In the above example, the DATE function is used to create a date without a time component by providing the year, month, and day values.
By employing the DATE function in Excel, you can effectively eliminate the time portion from a date, helping you manage and format your data more efficiently.

Credit: exceljet.net
Using The Right And Len Functions
Using the RIGHT and LEN functions in Excel can be an efficient way to manipulate date data and remove time from it. These functions allow you to extract the rightmost characters and determine the length of a cell value, enabling you to customize the format of your date data effectively.
Extracting The Rightmost Characters
To extract the rightmost characters of a date in Excel, you can use the RIGHT function. This function allows you to specify the number of characters to extract from the right-hand side of a cell’s value. By combining the RIGHT function with the LEN function, you can remove the time component from a date and display only the date portion.
Determining The Length Of A Cell Value, Ensuring Each Heading Adheres To Html Syntax
The LEN function in Excel can be utilized to determine the length of a cell’s value. By understanding the length of the date and time format, you can carefully use the RIGHT function to extract the necessary characters and remove the time component. This approach provides a flexible and accurate method for manipulating date data within Excel.
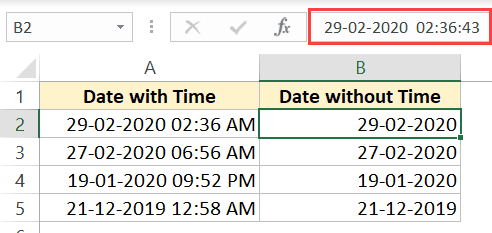
Using Custom Formats
Using custom formats is a powerful feature in Excel that allows you to manipulate how dates are displayed in your spreadsheet. By creating a custom date format, you can remove the time from the date and focus solely on the date itself. This can be particularly useful when working with large datasets or generating reports where you only need to display the date information.
Creating A Custom Date Format
To remove the time from a date in Excel, you need to create a custom date format. This can be done by following these simple steps:
- Select the cell or range of cells containing the dates you want to modify.
- Right-click the selected cells and choose “Format Cells” from the context menu.
- In the “Format Cells” dialog box, go to the “Number” tab.
- From the “Category” list, select “Custom.”
- In the “Type” field, enter a custom date format code. To remove the time, you can use “dd-mmm-yyyy” or “mm/dd/yyyy” as your format code.
- Click “OK” to apply the custom date format to the selected cells.
Applying The Custom Date Format
Once you have created the custom date format, you can apply it to your dates to remove the time. Here’s how:
- Select the cell or range of cells containing the dates you want to format.
- Right-click the selection and choose “Format Cells.”
- In the “Format Cells” dialog box, go to the “Number” tab.
- Select “Custom” from the “Category” list.
- In the “Type” field, select the custom date format you created.
- Click “OK” to apply the custom format to the selected cells.
And just like that, the time portion of your dates will be removed, leaving you with clean and focused date information. Using custom formats in Excel gives you the flexibility to customize the way dates are displayed in your spreadsheets, making it easier to analyze and present your data.
Frequently Asked Questions On How To Remove Time From Date In Excel
How Do I Convert Date And Time To Just Date In Excel?
To convert date and time to just a date in Excel, use the “TEXT” function with the “dd/mm/yyyy” format. Simply enter “=TEXT(cell_reference, “dd/mm/yyyy”)” and replace “cell_reference” with the cell containing the date and time.
How Do I Separate A Date And A Time In Excel?
To separate a date and time in Excel, use the TEXT function to extract either the date or time from the cell. For example, to extract the date from cell A1, use the formula =TEXT(A1,”MM/DD/YYYY”). To extract the time, use the formula =TEXT(A1,”HH:MM:SS”).
How Do I Change Date And Time To Time Only In Excel?
To change date and time to time only in Excel, use custom format hh:mm:ss. Select the cell, press Ctrl + 1, select Custom, and input the format.
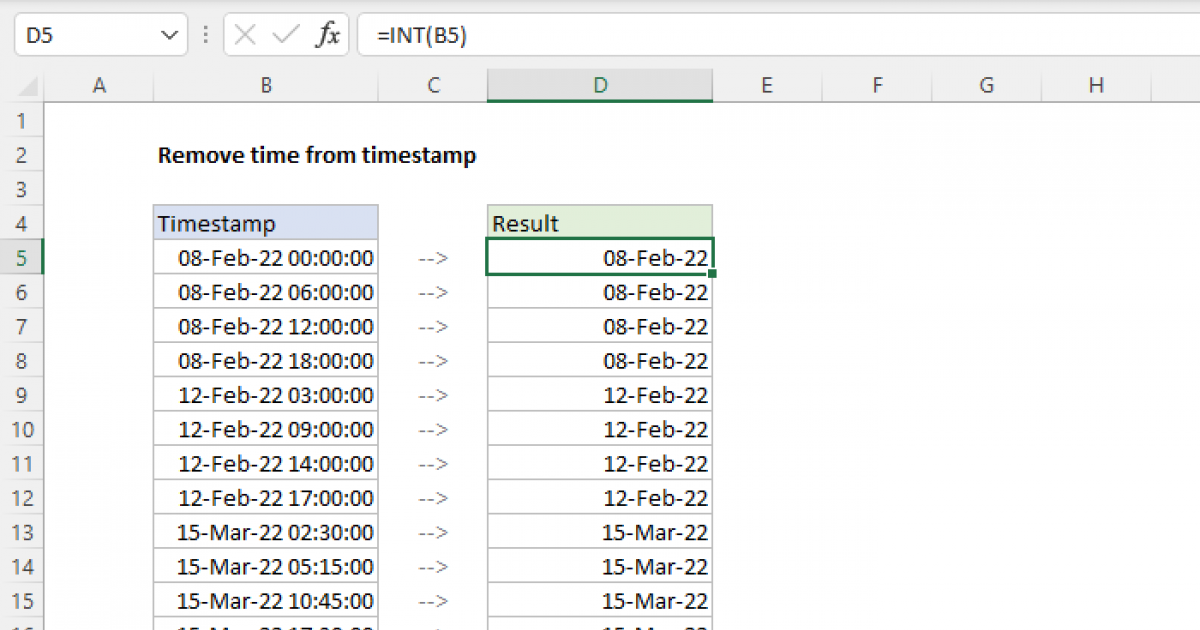
How Do I Convert Timestamp To Date In Excel?
To convert timestamp to a date in Excel, use the formula =DATEVALUE(TEXT(A1,”yyyy-mm-dd”)).
Conclusion
In just a few simple steps, you can easily remove time from date in Excel. This quick and effective solution will streamline your data processing, saving you valuable time and effort. By following the instructions provided, you can enhance the accuracy and efficiency of your Excel spreadsheets.
Say goodbye to time-related inaccuracies and boost your productivity today!