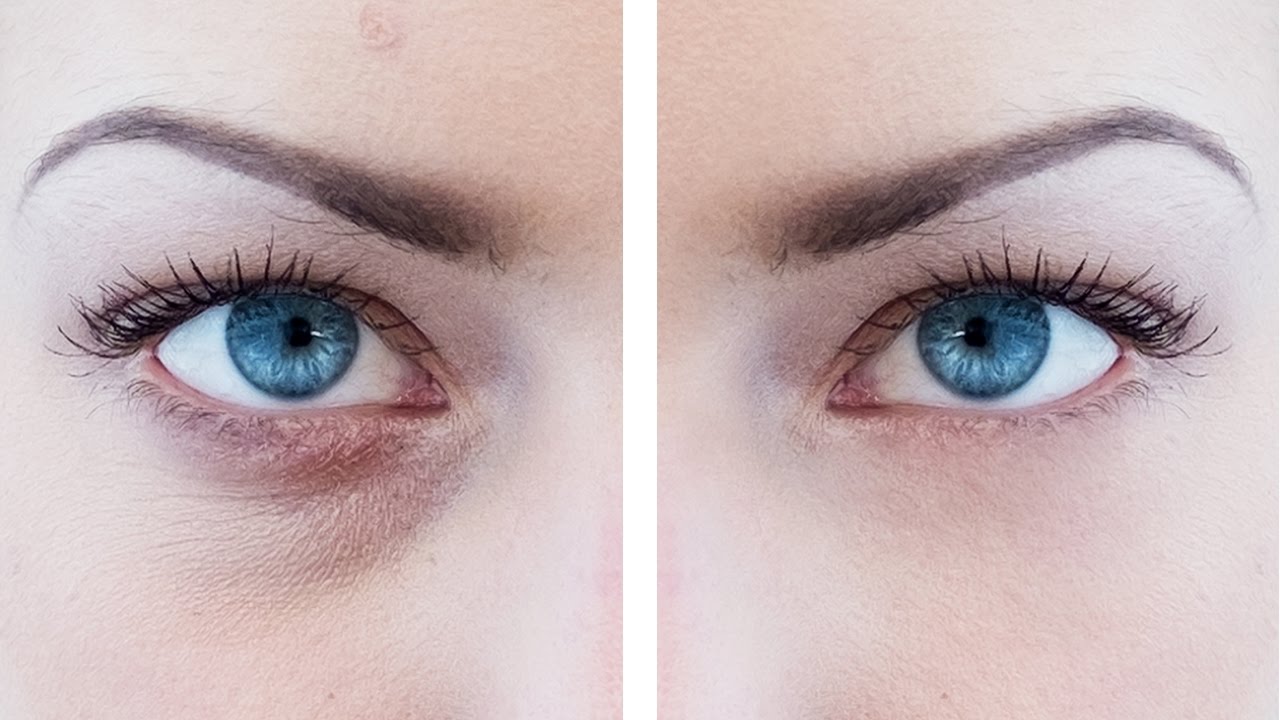
To remove bags under eyes in Photoshop, use the Healing Brush tool for a seamless and natural-looking result. Adjust brush size as needed.
Bags under the eyes can be a common concern for many individuals, causing them to seek solutions to enhance their appearance. With the advancement of technology, Photoshop offers a convenient way to eliminate these imperfections in photos. By utilizing the Healing Brush tool, one can easily diminish the bags under the eyes and achieve a more refreshed look.
This method allows for precise editing, ensuring a flawless and realistic outcome. Whether for personal use or professional projects, mastering this technique can significantly enhance the overall quality of images.
Credit: retutstudio.com
Understanding Bags Under Eyes
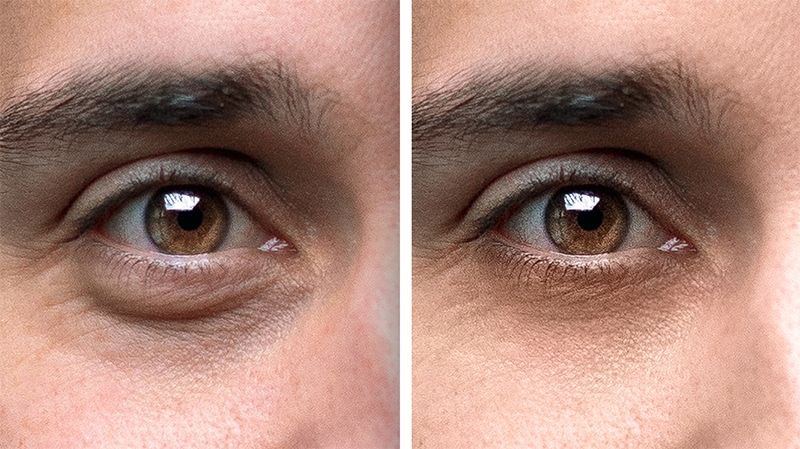
Bags under the eyes can be frustrating and can affect a person’s self-esteem. Understanding the causes and effects of bags under the eyes can provide valuable insight into how to effectively address them, both in real life and via photo editing tools like Photoshop.
Causes Of Bags Under Eyes
The causes of bags under the eyes can vary, but common contributors include genetics, aging, fluid retention, lack of sleep, allergies, and excessive sun exposure.
Effects Of Bags Under Eyes
Bags under the eyes can lead to a tired and aged appearance, diminished self-confidence, and may affect how one is perceived by others in both personal and professional settings.
Credit: www.picturecorrect.com
Preventing Bags Under Eyes
Healthy Lifestyle Habits
- Avoid excessive salt intake
- Stay hydrated by drinking plenty of water
- Get sufficient sleep each night
- Eat a balanced diet rich in fruits and vegetables
Skincare Routine
- Use gentle eye creams with moisturizing properties
- Apply cold compress to reduce puffiness
- Remove makeup before bedtime
- Avoid rubbing eyes vigorously
Natural Remedies For Bags Under Eyes
Find relief from stubborn under-eye bags with these natural remedies:
Cucumber Slices
Rejuvenate tired eyes with cool cucumber slices placed on eyelids for instant relaxation.
Tea Bags
- Recycle used tea bags by chilling them and applying them to the eyes for a soothing effect.
Cold Spoons
- Placing cold spoons on the under-eye area helps reduce puffiness and invigorate the skin.
Beauty Products For Bags Under Eyes
When it comes to combating bags under the eyes, beauty products play a crucial role in revitalizing and rejuvenating the delicate skin around the eyes. Understanding the benefits and key features of under eye creams and eye masks can be a game-changer in your skincare routine. Let’s dive into the world of beauty products for bags under eyes and explore the top solutions for achieving a refreshed and youthful look.
Under Eye Creams
Under eye creams are specifically formulated to target puffiness and dark circles, providing nourishment and hydration to the skin. Rich in antioxidants and essential nutrients, these creams work to reduce inflammation and improve skin texture. Look for products containing caffeine, vitamin C, or hyaluronic acid for their proven efficacy in combating bags under the eyes.
Eye Masks
Eye masks offer a luxurious and effective solution for addressing under eye concerns. Infused with potent ingredients, such as cucumber extract, aloe vera, and collagen, these masks deliver a cooling and soothing sensation while reducing puffiness and fatigue. Regular use of eye masks can visibly diminish the appearance of bags under the eyes, leaving the skin feeling refreshed and revitalized.
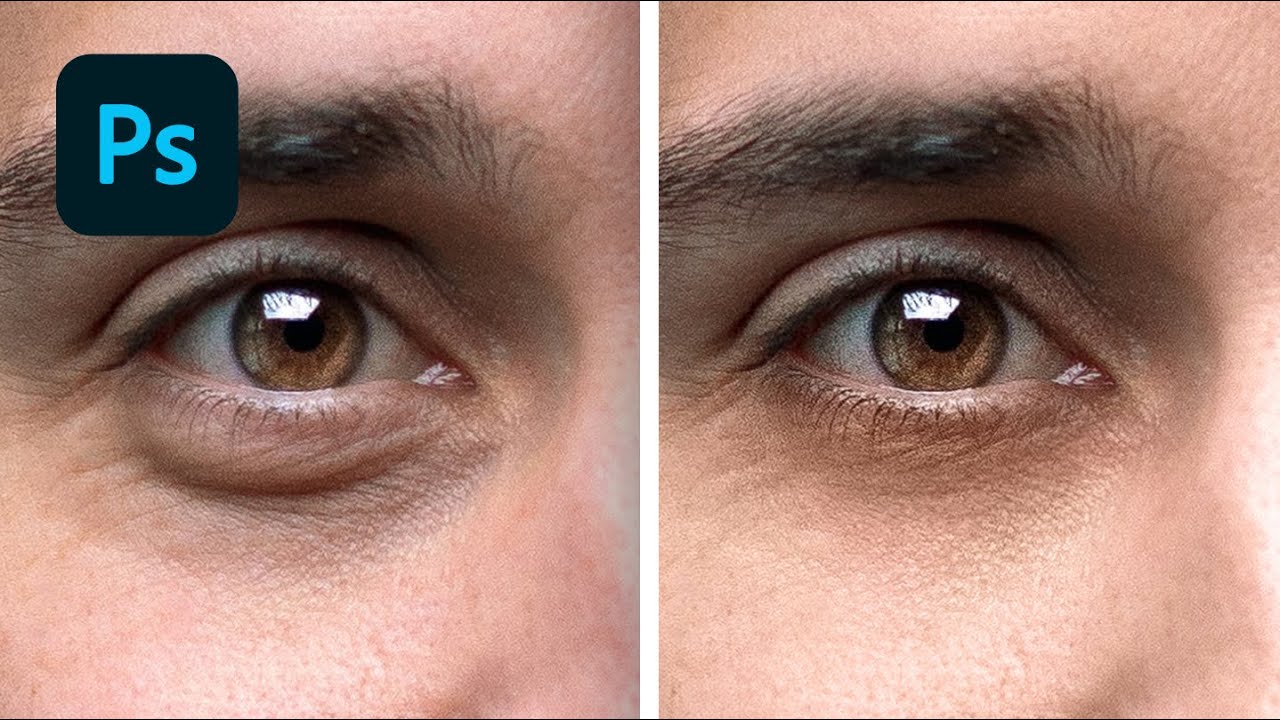
Photoshop Techniques To Remove Bags Under Eyes
The bags under our eyes can sometimes give a tired and aged appearance to our faces. Luckily, with the help of Photoshop, we can easily remove these imperfections and achieve a more refreshed and youthful look. In this article, we will explore three powerful Photoshop techniques: the Clone Stamp Tool, the Healing Brush Tool, and Content-Aware Fill, that can effectively remove bags under the eyes in just a few simple steps.
Clone Stamp Tool
The Clone Stamp Tool in Photoshop allows you to sample parts of an image and then clone or paint over another area. This tool is particularly useful for removing bags under the eyes by copying a clean area and applying it over the affected areas.
To use the Clone Stamp Tool, follow these steps:
- Select the Clone Stamp Tool from the toolbar on the left side of the Photoshop interface.
- Adjust the brush size according to the size of the bag under the eye. To do this, click on the brush size icon at the top menu and drag the slider until you achieve the desired size.
- Hold the Alt key (Option key for Mac users) and click on a clean area near the bag under the eye to sample it.
- Release the Alt key and carefully paint over the bag under the eye using short and gentle brush strokes. Aim to blend the colors and textures seamlessly.
- Repeat the process if needed, sampling different parts of the image to create a natural and consistent look.
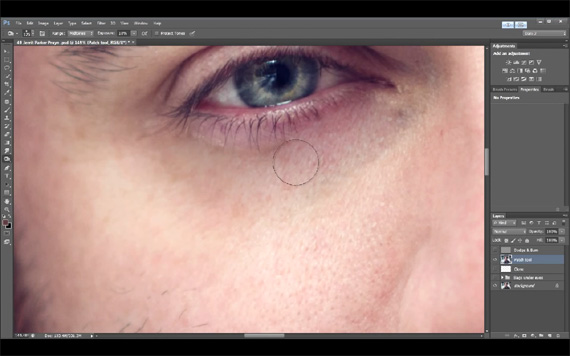
Healing Brush Tool
The Healing Brush Tool is another useful feature in Photoshop that helps remove under-eye bags while automatically blending the surrounding colors and textures.
Follow these steps to utilize the Healing Brush Tool:
- Select the Healing Brush Tool from the toolbar on the left side of the Photoshop interface.
- Adjust the brush size to fit the bag under the eye and ensure that the “Sample All Layers” option is checked.
- Hold the Alt key (Option key for Mac users) and click on a clean area near the bag under the eye to sample it.
- Release the Alt key and carefully brush over the bag under the eye, moving in short strokes to blend the area with the rest of the face.
- Repeat the process if necessary, ensuring the under-eye bags are thoroughly removed while maintaining a natural appearance.
Content-aware Fill
The Content-Aware Fill feature in Photoshop is a powerful tool that automatically generates pixels based on the surrounding image to fill in selected areas. This technique can be used to remove under-eye bags effectively.
To use Content-Aware Fill, follow these steps:
- Select the area of the under-eye bag using the lasso tool, polygonal lasso tool, or any other selection tool of your preference.
- Go to the “Edit” menu and choose “Fill”.
- In the Fill dialog box, select “Content-Aware” from the Contents drop-down menu.
- Click “OK” and let Photoshop analyze the surrounding areas and generate the best replacement.
- Review the filled area and apply any necessary adjustments to ensure a seamless blend with the rest of the image.
With the help of these three Photoshop techniques – Clone Stamp Tool, Healing Brush Tool, and Content-Aware Fill – you can easily remove bags under the eyes and achieve a youthful and rejuvenated appearance. Experiment with these tools, practice, and soon you’ll be able to retouch photos flawlessly!
Credit: retutstudio.com
Frequently Asked Questions Of How To Remove Bags Under Eyes Photoshop
How Do You Remove Eye Bags From Pictures?
To remove eye bags from pictures, use photo editing software with tools like the “healing brush” or “clone stamp” to smoothen and blend the area. Adjust brightness and contrast for a more natural look. Or Use the “redeye” tool to reduce puffiness.
Try different techniques until you achieve the desired results.
How Do You Remove The Bags Under Your Eyes?
To reduce bags under eyes, try getting enough sleep, using cold compresses, and avoiding salty foods. Applying cucumber slices or tea bags can also help. Additionally, using a gentle eye cream and staying hydrated may improve the appearance of under-eye bags.
How Do I Get Rid Of Lines Under My Eyes In Photoshop?
To remove lines under your eyes in Photoshop, use the Spot Healing Brush tool. Select the tool, brush over the lines, and let Photoshop automatically blend them in. Adjust the brush size for precision. Remember to save your work!
How Do I Fix Bags In Photoshop?
To fix bags in Photoshop, use the Healing Brush tool to remove imperfections, adjusting opacity for natural look.
Conclusion
We’ve explored various techniques to remove under-eye bags using Photoshop. With the right tools and skills, you can achieve natural-looking results. Remember to work with light and shadow, utilize the healing brush, and use the liquify tool sparingly. Don’t be afraid to experiment and practice for the best outcome!