To export multiple photos in Photoshop, select the images you want to export and go to File > Export > Export As. In the Export As dialog box, choose your desired settings and click Export.
Looking to efficiently export multiple photos in Photoshop? With just a few simple steps, you can easily streamline the process and save time. By utilizing the Export As feature in Photoshop, you can quickly export multiple images with customized settings to meet your requirements.
This handy tool allows you to maintain consistency across your exported photos while ensuring a seamless workflow. Whether you’re a professional photographer or a beginner looking to enhance your photo editing skills, mastering this technique will boost your productivity and efficiency in managing multiple images simultaneously. Let’s dive into the details of how you can export multiple photos in Photoshop effortlessly.
Setting Up The Workspace
When it comes to exporting multiple photos in Photoshop, setting up the workspace is an essential step that can streamline the process. To ensure a smooth export, it’s important to organize and select the photos effectively within Photoshop. This blog post will guide you through the process of setting up the workspace for exporting multiple photos, helping you to save time and effort.
Selecting The Photos To Export
Before diving into the export process, ensure that you have selected all the relevant photos that you want to export from Photoshop. You can use the following methods to select multiple photos:
- Click and drag to select a group of photos at once.
- Hold down the Ctrl (Command on Mac) key and click on individual photos to select non-contiguous items.
- Utilize the Shift key to select a range of photos from the first to the last one clicked.
Organizing The Photos In Photoshop
Organizing your photos in Photoshop can help streamline the export process. Consider grouping them by folder or utilizing the “Collections” feature to keep your photos organized within the software. By doing so, you can easily locate and select the photos you want to export.
Credit: m.youtube.com
Choosing The Export Settings
To export multiple photos efficiently in Photoshop, selecting the appropriate export settings is crucial. This step ensures that your images are saved in the desired format and quality.
Selecting The Desired File Format
When exporting multiple photos in Photoshop, choose the best file format for your needs, such as JPEG, PNG, or TIFF, based on the purpose of the images.
Customizing The Image Size And Resolution
Adjust the image size and resolution according to the specific requirements of the intended use. This step enables you to ensure that each photo is optimized for its purpose.
Applying Image Adjustments
Learn how to easily apply image adjustments to multiple photos using Photoshop. This effective technique allows you to enhance your images and streamline your workflow for efficient editing.
- Open the batch of photos in Photoshop.
- Go to the “Image” menu and select “Adjustments”.
- Apply basic edits globally to all photos, like brightness or contrast.
- Save changes to all images at once after editing.
- Select the photo you want to apply adjustments to.
- Navigate to the “Adjustments” panel on the right side.
- Make individual changes to specific photos as needed.
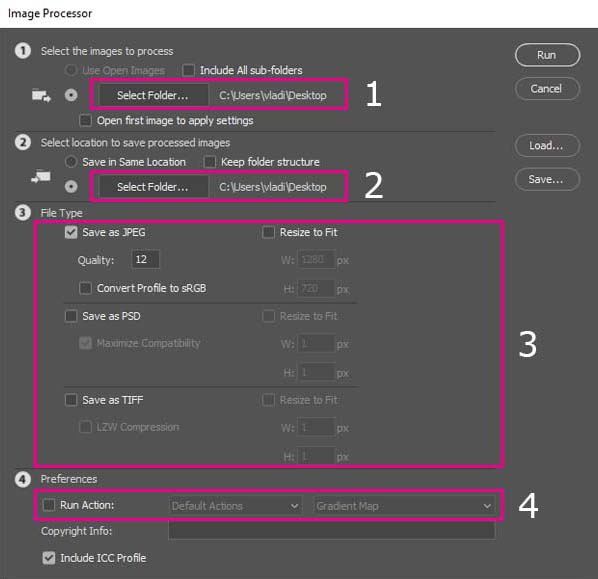
Configuring The Output Options
Configuring the output options in Photoshop when exporting multiple photos is an essential step in ensuring that your images are saved in the desired format and location. It allows you to customize the destination folder and naming convention for the exported files, delivering efficiency and consistency to your workflow.
Choosing The Destination Folder
When exporting multiple photos in Photoshop, the first step is to select the destination folder where the images will be saved. To do this, navigate to the “Export” dialogue box and click on the “Choose” button next to the “Destination” option. A window will appear, allowing you to browse and select the desired folder on your computer. Once selected, click “Choose” to confirm the destination folder.
Naming The Exported Files
Customizing the naming convention for the exported files can help maintain organization and distinguish between different sets of images. In the “File Naming” section of the export dialogue box, you can specify how the files will be named. This includes options such as adding a prefix or suffix, numbering the files, or incorporating metadata into the file names. By defining a clear naming structure, you can streamline the post-export organization of your photos.
Exporting The Photos
Learn how to quickly export multiple photos in Photoshop with ease. Simply select the images you want to export, choose the export settings, and then save your files to your desired location. This efficient process is a time-saving solution for managing and exporting large batches of photos in Photoshop.
Reviewing The Export Settings
Before initiating the export process in Photoshop, it is crucial to review and configure the export settings to ensure the photos are exported according to your desired specifications. Taking a few minutes to go through these settings will prevent any missteps and save you time in the long run. To review the export settings:- Open Photoshop and navigate to the “File” menu.
- Select “Export” and then choose the “Export As” option.
- A dialog box will appear, displaying the export settings.
- Review the format, quality, and size options available.
- Choose the appropriate file format: You can export your photos in various formats such as JPEG, PNG, or TIFF. Each format has its own advantages and use cases, so select the one that best suits your needs.
- Consider the quality settings: Adjust the quality slider to specify the level of compression you want for your exported images. Keep in mind that higher quality usually results in larger file sizes.
- Set the desired size: Determine the dimensions (width and height) that you want for your exported photos. Photoshop allows you to resize the images during export, enabling you to optimize their size for different purposes.
Initiating The Export Process
Once you have reviewed and configured the export settings for your photos in Photoshop, it’s time to initiate the export process. Follow these steps to export multiple photos effortlessly:- Select the photos you want to export from the Photoshop workspace. You can either choose them individually or use the “Shift” key to select multiple photos at once.
- With the desired photos selected, navigate to the “File” menu and click on “Export” followed by “Export As”.
- The export settings dialog box will appear, displaying the previously reviewed settings.
- Specify the destination folder where you want to save the exported photos. Make sure to choose a location that is easily accessible and organized.
- Enter a suitable name for the exported photos. Ideally, use a naming convention that describes the content or purpose of the images.
- Optional: If you want to export the photos with specific metadata, make sure to check the relevant boxes or modify the metadata settings.
- Click the “Export” button: Photoshop will start processing and exporting the selected photos according to the configured settings.

Credit: inspireme.blog
Credit: inspireme.blog
Frequently Asked Questions For How To Export Multiple Photos In Photoshop
Can You Export Multiple Photoshop Files At Once?
Yes, you can export multiple Photoshop files at once by using the “Export Layers to Files” feature.
How Do I Save Multiple Pictures In Photoshop?
To save multiple pictures in Photoshop, use the “Save for Web” feature, select desired settings, and click Save.
How Do I Export Multiple Pictures At Once?
To export multiple pictures at once, select all the images you want to export, then use the “Export” or “Save As” function in your photo editing software. Choose your desired file format and destination folder, then click “Export” to save all selected pictures simultaneously.
How Do I Export All Edited Photos In Photoshop?
To export all edited photos in Photoshop, go to the “File” menu and select “Export” followed by “Export As”. Choose the desired file format, set the destination folder, adjust settings if needed, and click “Export All”.
Conclusion
Mastering the art of exporting multiple photos in Photoshop is a game-changer for photographers. With the plethora of options available, it’s essential to choose the right format and settings. By following the step-by-step guide, you can streamline your workflow and ensure your images are exported efficiently and in high quality.
Happy editing!