To screenshot Excel, press “PrtScn” key on keyboard and paste in an image editor to save. Screenshotting is a quick way to capture Excel data for sharing or reference.
Excel is a powerful tool for organizing and analyzing data, and sometimes you may need to save or share a snapshot of your work. Whether you want to showcase a specific calculation or share a chart with colleagues, taking a screenshot is a simple solution.
By following a few easy steps, you can capture and save your Excel data in a clear and convenient format that can be easily shared or stored for future reference. Let’s explore the process of capturing Excel screenshots and how it can be beneficial in various professional and personal scenarios.
Why Screenshots In Excel Are Useful
Using screenshots in Excel can be a game-changer when it comes to effectively communicating data, processes, and issues. Whether it’s for documentation, troubleshooting, or sharing brief snapshots of important information, screenshots in Excel can enhance the way you work and present information. Let’s delve into why screenshots in Excel are such a valuable tool.
Capturing Screenshots
Capturing screenshots in Excel is a straightforward process, enabling you to grab specific sections of your spreadsheet or an entire worksheet. By utilizing the built-in screenshot function, you can conveniently capture relevant data and instantly integrate it into your documents.
Benefits Of Using Screenshots
- Enhanced Communication: Screenshots provide visual aid, making it easier to convey complex data and processes to colleagues or clients.
- Efficient Documentation: Rather than explaining intricate details in lengthy text, screenshots offer a concise and effective way to document specific Excel features or issues.
- Visual Reference: Utilizing screenshots can serve as a visual reference for future analysis, aiding in troubleshooting and data interpretation.
- Streamlined Reporting: Incorporating screenshots into reports can significantly enhance the understanding of data and findings, improving overall readability.
Different Ways To Capture Screenshots In Excel
Capture screenshots in Excel using various methods to enhance your workflow.
Using The Print Screen Key
Press Print Screen key, then Paste into Excel to capture a screenshot.
Using The Snipping Tool
Access the Snipping Tool, select area, then save the screenshot for Excel.
Built-in Screenshot Feature
In Excel, use the built-in screenshot feature for quick and easy captures.
Enhancing Screenshots In Excel
Enhance your Excel screenshots with simple techniques for improved clarity and presentation. Effortlessly enhance charts and images in Excel to make your data more visually appealing and engaging.
Enhancing Screenshots in Excel Enhancing screenshots in Excel can help make your data more visually appealing and easier to comprehend. With a few simple tricks, you can elevate your screenshots to a whole new level of professionalism and clarity. Crop and Resize Screenshots Cropping and resizing screenshots allows you to focus on the most important parts of your data. To crop a screenshot in Excel, select the image and use the crop tool to adjust the size. Additionally, resizing screenshots can be done by dragging the corners of the image to make it larger or smaller. Annotate Screenshots Annotating screenshots can provide additional context or explanations to your data. Using the drawing tools in Excel, you can add arrows, text boxes, shapes, and more to highlight key points or trends within your screenshots. This makes it easier for your audience to understand the information you are presenting. Adding Screenshots to Shapes or Objects Incorporating screenshots into shapes or objects can further enhance the visual appeal of your data. By adding screenshots to shapes such as circles, squares, or arrows, you can create dynamic and interactive presentations. This feature allows you to customize the look of your screenshots and make them more engaging for your audience. By utilizing these techniques to enhance your screenshots in Excel, you can elevate the quality of your data presentations and make a lasting impression on your audience.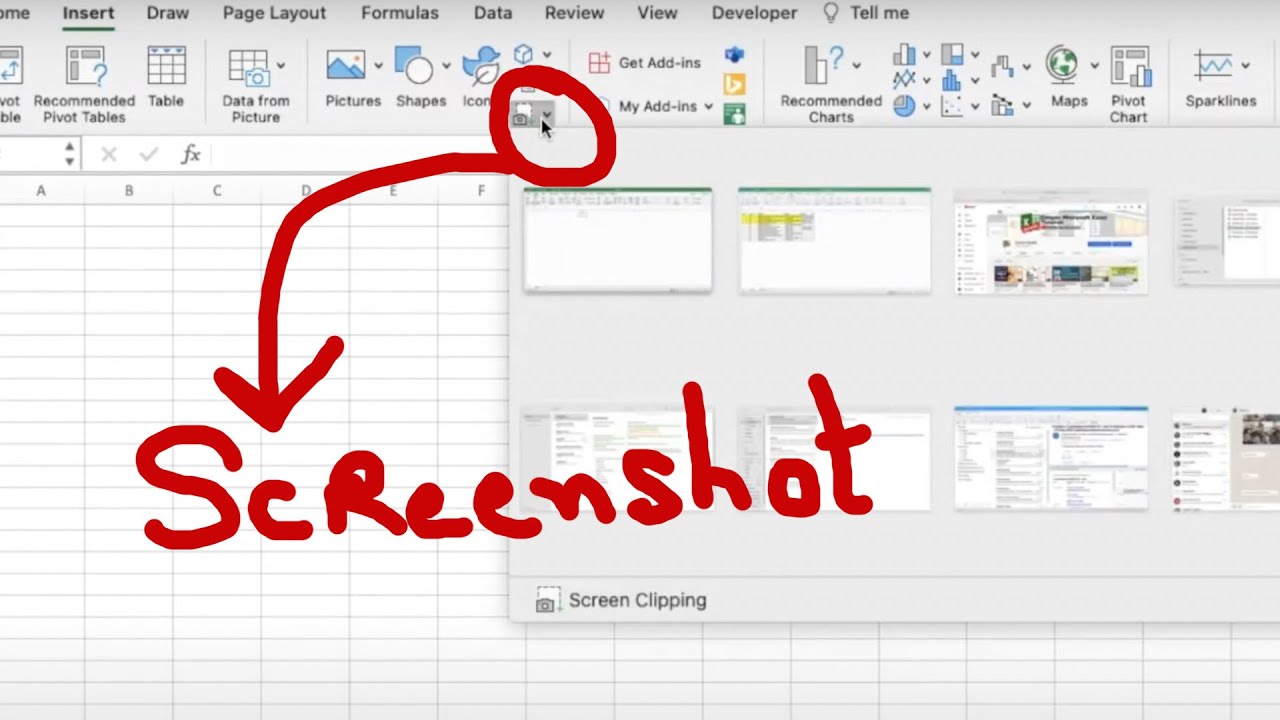
Credit: m.youtube.com
Organizing And Managing Screenshots In Excel
Organizing and managing screenshots in Excel is a crucial aspect of data organization and accessibility. With the ability to take and insert screenshots directly into Excel, it’s essential to have a systematic approach to organizing and managing these visuals effectively. Let’s delve into the key strategies for creating a screenshot repository, naming and tagging screenshots, and organizing them into categories.
Creating A Screenshot Repository
Creating a dedicated screenshot repository within your Excel workbook provides a centralized location for storing all your screenshots. This can be accomplished by inserting a new worksheet specifically for screenshots, ensuring easy access and organization.
Naming And Tagging Screenshots
Naming and tagging your screenshots with descriptive titles and keywords can significantly enhance searchability and facilitate quick retrieval. It’s recommended to employ a consistent naming convention and incorporate relevant tags to streamline the identification process.
Organizing Screenshots Into Categories
Organizing screenshots into categories based on their content or purpose helps in maintaining order and structure. Utilize folders or tables to segregate screenshots, making it effortless to locate specific visuals when needed.
Best Practices For Using Screenshots In Excel
Screenshots are a handy tool when it comes to documenting and sharing information in Excel. Whether you want to capture a specific chart, a table, or a portion of your worksheet, screenshots help you convey your message effectively. In this blog post, we will explore some best practices for using screenshots in Excel.
Using High-quality Screenshots
When taking screenshots in Excel, it is crucial to ensure that they are of high quality. This means capturing clear and readable images that accurately represent the data or information you want to convey. To achieve this, you can follow these best practices:
- Use the built-in screenshot tool in Excel to eliminate any distortion or blurriness.
- Resize the screenshot to fit the desired space without sacrificing readability.
- Avoid capturing unnecessary elements or clutter in your screenshots.
- Highlight important areas or data points within the screenshot using annotations or callouts.
Updating Screenshots When Data Changes
Data in Excel spreadsheets is often subject to change. It is important to keep your screenshots up to date to ensure the accuracy of the information you share. Here are some tips on updating screenshots when data changes:
- Regularly review your screenshots to identify any outdated data or information.
- When changes occur, retake the screenshot to reflect the most recent version of the data.
- If the changes are incremental, consider using a visual highlighting tool (such as arrows or circles) to indicate the specific modifications within the screenshot itself.
Keeping A Backup Of Screenshots
As with any digital content, it is wise to keep a backup of your screenshots in case of accidental deletion or data loss. By following these best practices, you can ensure the safety and availability of your Excel screenshots:
- Create a dedicated folder or directory on your computer or cloud storage system to organize and store your screenshots.
- Regularly back up your screenshot folder to an external hard drive or cloud storage service.
- Consider using timestamps or descriptive file names to easily identify and locate specific screenshots when needed.

Credit: earnandexcel.com

Credit: www.pcworld.com
Frequently Asked Questions Of Screenshot Excel
How Do I Take A Screenshot Of An Excel Spreadsheet?
To capture a screenshot of an Excel spreadsheet, use the “Print Screen” key on your keyboard or the “Snipping Tool” in Windows. For Mac, press Command + Shift + 4 and then drag to select the area. You can also use Excel’s built-in “Screenshot” feature for quick and easy captures.
How Do I Take A Picture Of An Excel Spreadsheet?
To capture an image of an Excel spreadsheet, use the built-in screenshot function on your device. On a Windows computer, press “Windows key + Shift + S”, then select the area to capture. On a Mac, press “Command + Shift + 4”, then drag the cursor over the desired area.
What Is The Shortcut For Snipping Tool In Excel?
The shortcut for snipping tool in Excel is “Windows key + Shift + S”. This shortcut allows you to capture a screenshot seamlessly.
How Do I Turn A Screenshot Into Excel?
To turn a screenshot into Excel, open Excel and go to the “Insert” tab. Select “Screenshot” and choose the image. Crop or edit as needed.
Conclusion
Incorporating Excel screenshots enhances clarity and communication in data-driven reports. Understanding how to take, edit, and use screenshots in Excel is beneficial for professionals across various industries. By following the steps outlined in this blog post, you can elevate the quality of your reports and presentations, ultimately improving your professional image and expertise.