To edit categories in QuickBooks, navigate to the Gear icon > Lists > Chart of Accounts. Then, find the category to edit, click Edit, make changes, and save.
Editing categories in QuickBooks allows for better organization and accurate financial reporting. By properly managing categories, businesses can track expenses and income efficiently. This helps in making informed financial decisions and maintaining accurate records for tax purposes. QuickBooks’ user-friendly interface simplifies the process of editing categories, making it accessible to even those with limited accounting knowledge.
Properly categorized transactions enhance the overall functionality of QuickBooks, ensuring smooth financial management for businesses of all sizes.
Why Edit Categories In Quickbooks
When managing your finances in QuickBooks, it’s crucial to have accurate and well-organized categories. Editing categories in QuickBooks is essential to ensure that your financial records are clear and reflect the true nature of your business transactions. By maintaining accurate categories, you can easily identify and correct errors, track expenses efficiently, and gain valuable insights into your business’s financial health.
Error Correction
Editing categories in QuickBooks allows you to identify and rectify any errors in your financial records. Whether it’s a misclassified expense or an incorrect income category, keeping your categories up to date enables you to maintain accurate financial statements and gain a clear picture of your business’s performance.
Tracking Expenses
Editing categories in QuickBooks plays a crucial role in tracking your expenses effectively. By organizing your expenses into relevant categories, you can analyze your spending patterns, identify areas where you can reduce costs, and make informed financial decisions to optimize your business’s profitability.
Accessing The Category Management
Accessing the Category Management: Managing categories in QuickBooks is essential for organizing your financial data. To get started, you’ll need to access the Category Management feature.
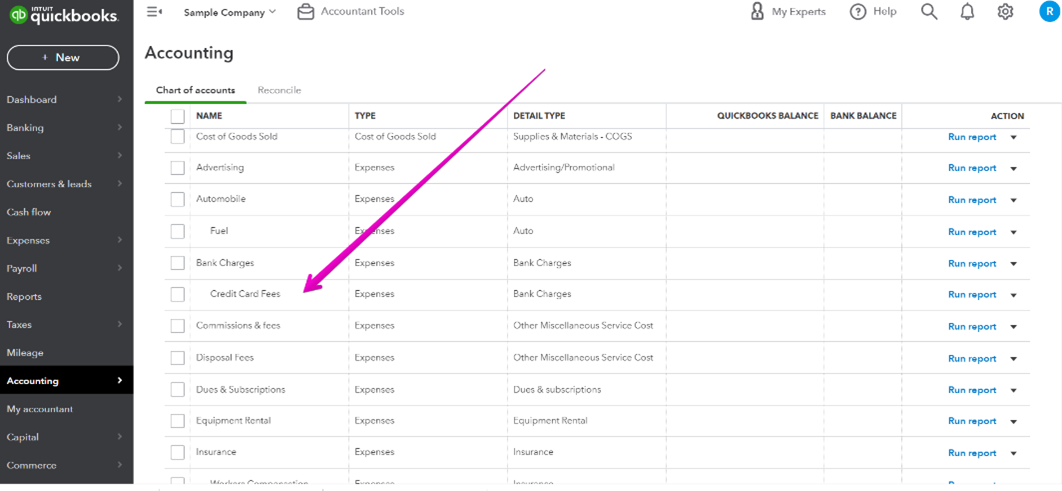
Navigating The Menu:
- Locate the ‘Lists’ menu at the top of the QuickBooks interface.
- Click on ‘Chart of Accounts’ to access the list of categories.
Opening The Category List:
- Once in the ‘Chart of Accounts,’ find and select the category you wish to edit.
- Click on the category name to open its details for editing.
Editing Categories
Editing Categories: In QuickBooks, maintaining accurate categories is crucial for proper financial organization. Editing categories allows you to update, modify, and refine the details associated with your business transactions.
Selecting A Category:
- Click on the Lists menu in QuickBooks.
- Select Chart of Accounts.
- Locate the category you want to edit and double-click on it.
Updating Category Details:
- Update the category name or description as needed.
- Adjust the account type for the category if necessary.
- Click Save to apply the changes to the category.
Credit: www.mycloudbookkeeping.org
Creating New Categories
When it comes to managing your finances in QuickBooks, creating new categories is an essential aspect of customizing your account to best suit your business needs. Whether you need to track specific expenses, income, or assets, learning how to create new categories in QuickBooks will help you organize and manage your financial data more effectively.
Identify The Need For A New Category
Before adding a new category in QuickBooks, it’s crucial to identify the specific need for it. Start by analyzing your current categories and determining if there are any gaps or missing classifications that are essential for tracking your financial transactions. Whether it’s a new expense type, revenue stream, or asset category, identifying the need for a new category is the first step towards maintaining accurate financial records.
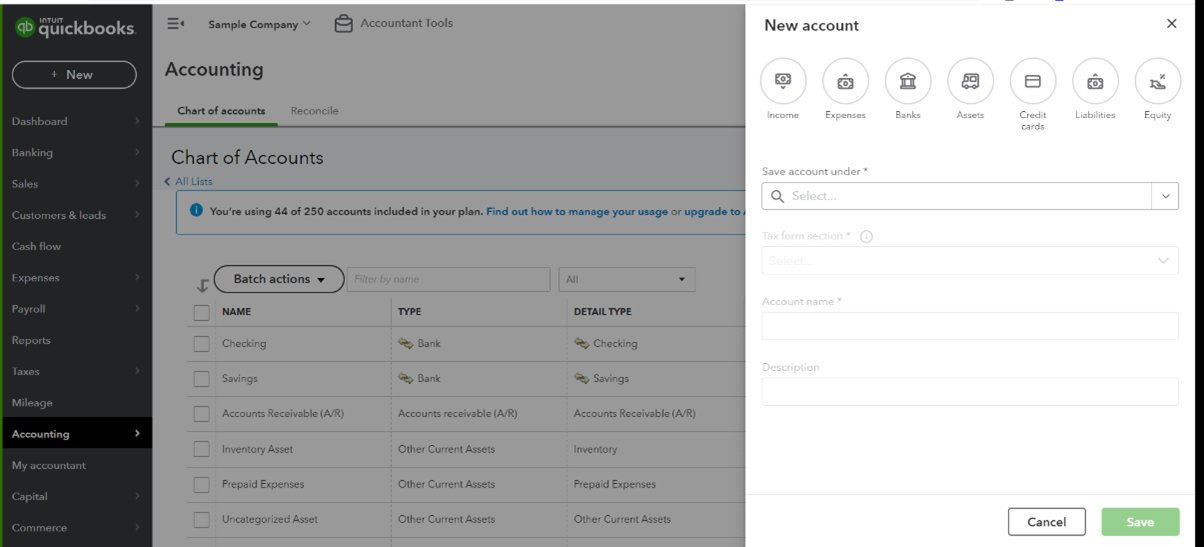
Adding A New Category
Adding a new category in QuickBooks is a straightforward process that allows you to tailor your account to meet your unique business requirements. To do this, navigate to the “Lists” menu and select “Chart of Accounts.” Once there, click on the “Account” button and choose “New” to start creating a new category. Fill in the necessary details, such as the category type, name, and description, ensuring that each field accurately reflects the purpose and nature of the new category.
Best Practices For Category Management
Managing your categories effectively is vital for accurate bookkeeping in QuickBooks. Consistency in naming, regular review, and cleanup are the key best practices for category management. By following these guidelines, you can maintain a well-organized and easily navigable category structure. Let’s take a closer look at each practice in detail:
Consistency In Naming
When it comes to naming your categories in QuickBooks, consistency is key. By applying a systematic approach, you can ensure that your categories are named consistently throughout your accounting system. This consistency aids in proper sorting, filtering, and reporting of financial data. To achieve this, consider the following:
- Use a standardized naming convention: Create a clear and intuitive naming convention that reflects your business’s unique needs. For example, you may choose to structure your categories based on hierarchical levels, separating them with a colon or a dash, such as “Income: Sales” or “Expenses – Marketing.”
- Avoid unnecessary abbreviations or acronyms: While abbreviations can save space, they can also lead to confusion. Ensure that your category names are easily understandable by avoiding excessive use of abbreviations or acronyms.
- Include relevant details in the name: Make sure to include important information in the category name. This helps you identify and differentiate between similar categories, especially when generating reports or analyzing financial data.
Regular Review And Cleanup
In order to maintain an accurate and efficient category structure, it’s crucial to conduct regular reviews and cleanups. This ensures that your categories remain up-to-date and relevant to your current business needs. Consider implementing the following practices:
- Periodically review category usage: Take the time to review how your categories are being used. Identify any categories that are no longer relevant or are underutilized. This will help you streamline your category structure and eliminate any unnecessary clutter.
- Consolidate or recategorize as needed: During the review process, merge similar categories or recategorize transactions if required. By doing so, you can simplify your chart of accounts and improve the accuracy of your financial reports.
- Archive unused categories: If you come across any categories that are no longer in use, consider archiving them rather than deleting them outright. This allows you to preserve historical data while keeping your active category list organized and easier to manage.
By practicing consistency in naming and regularly reviewing and cleaning up your categories, you can optimize your category management in QuickBooks. These best practices help you maintain accurate records, improve reporting capabilities, and simplify your overall accounting process.

Credit: quickbooks.intuit.com
Credit: www.mycloudbookkeeping.org
Frequently Asked Questions On How To Edit Categories In Quickbooks
How Do I Clean Up Categories In Quickbooks?
To clean up categories in QuickBooks, follow these steps: 1. Go to the Chart of Accounts. 2. Review and select the category you want to clean up. 3. Edit or merge the category as needed. 4. Make sure to update any transactions associated with the category.
5. Repeat the process for other categories if required.
How Do I Manage Expense Categories In Quickbooks?
To manage expense categories in QuickBooks, go to the “Settings” tab, click on “Chart of Accounts,” then select “New” to create or edit categories as needed. Ensure to label and organize expenses accurately to track finances effectively.
How Do I Reclassify Items In Quickbooks?
To reclassify items in QuickBooks, go to the Chart of Accounts, select the account, click Edit, then choose the correct category.
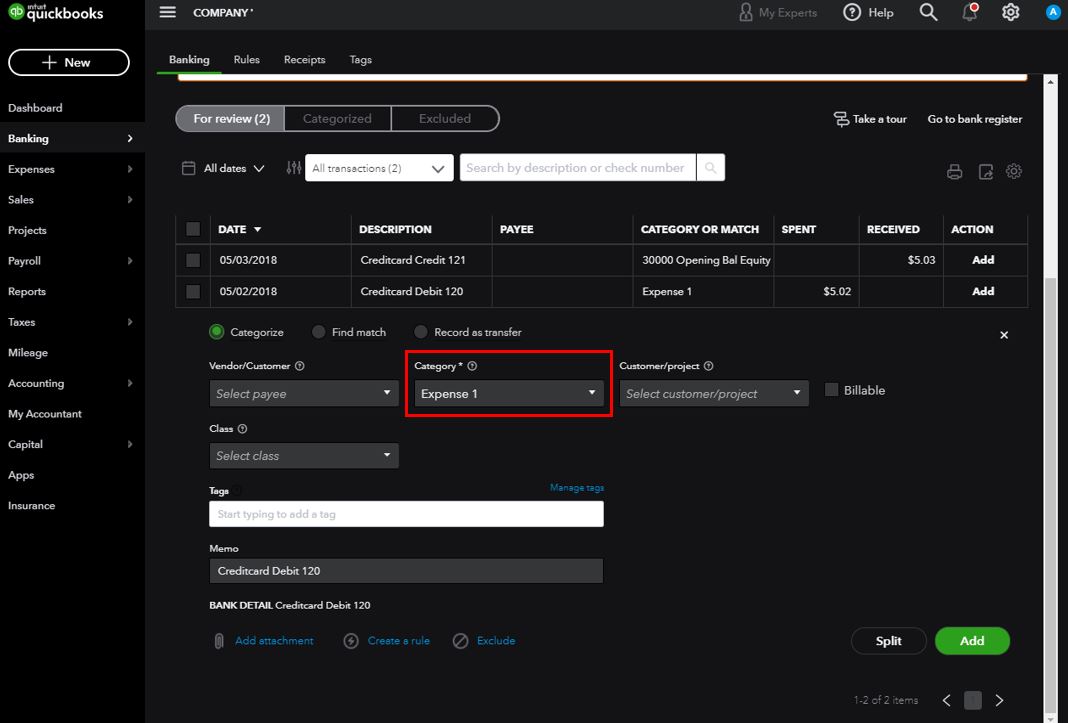
How Do You Undo Categorization In Quickbooks Online?
To undo categorization in QuickBooks Online, go to the transaction, select the categorization field, delete the current category, then re-enter correct category information.
Conclusion
Editing categories in QuickBooks is an essential task for maintaining accurate financial records. By following the step-by-step guide provided in this blog post, you can simplify the process and ensure that your accounting data is organized and accurate. Implement these tips to streamline your bookkeeping and enhance your business operations.