To delete a company from QuickBooks, navigate to the Company menu and select Close Company. Confirm deletion when prompted.
Deleting a company from QuickBooks may be necessary when a business closes or undergoes restructuring. By following a few simple steps, you can efficiently remove the company from your QuickBooks account. This process ensures that your financial records remain accurate and up to date.
In this guide, we will provide you with step-by-step instructions on how to delete a company from QuickBooks, allowing you to streamline your accounting tasks and maintain organized records. “
Why Delete A Company From Quickbooks
When it’s time to tidy up your QuickBooks, deleting a company might be necessary. Whether you’re freeing up space or closing a business, knowing how to delete a company from QuickBooks is a useful skill. This guide will help you navigate this process smoothly.
Freeing Up Space
If you’ve reached the limit of company files available in your QuickBooks Online subscription, it’s essential to free up some space. Deleting inactive or unnecessary companies can help optimize your account and improve performance.
Closing A Closed Business
When a business has permanently ceased operations, it’s crucial to remove its company file from QuickBooks. This ensures that outdated records don’t clutter your financial data and simplifies your accounting processes.
Credit: www.conectier.com
Steps To Delete A Company From Quickbooks
Deleting a company from Quickbooks is a straightforward process that can help you manage your financial data efficiently. Follow the steps below to remove a company from your Quickbooks account.
Backup Your Company File
- Create a backup of your company file to avoid losing any important data.
Log Into The Quickbooks Website
- Visit the Quickbooks website and log in using your credentials.
Select The Company You Want To Delete
- Choose the company you wish to delete from the list of companies displayed.
Go To The Company Settings
- Access the settings of the selected company to proceed with the deletion.
Delete The Company
- Click on the option to delete the company and confirm the action.
This process ensures that the unwanted company is removed from your Quickbooks account without any complications.
Recovering A Deleted Company
Learn how to recover a deleted company in Quickbooks with these helpful tips and avoid the hassle of starting from scratch. Restore your business data seamlessly and get back on track quickly.
Contact Quickbooks Support
Getting in touch with Quickbooks support is the first step towards recovering a deleted company. They can guide you through the process and provide the necessary assistance.
Provide Necessary Details
Ensure you have all the necessary details ready, such as the company name, account information, and any relevant backup files. This will help expedite the recovery process.
Follow The Instructions
Follow the instructions provided by Quickbooks support carefully to ensure a smooth recovery process. Missing any steps could lead to further complications.
Credit: quickbooks.intuit.com
Important Considerations
When deleting a company from QuickBooks, there are important considerations to keep in mind. It’s crucial to proceed with caution and ensure that necessary steps are taken to avoid any data loss or complications in the future.
Double-check Before Deleting
Before proceeding with deleting a company from QuickBooks, it’s important to double-check whether it’s absolutely necessary. Assess the implications of removing the company and consider if there are alternative solutions that could be explored.
Save Important Data
Prior to deleting the company, it’s essential to backup all important data. This includes financial records, reports, customer information, vendor details, and any other critical data that may be required for reference or legal purposes in the future.
Understanding The Consequences
It’s crucial to comprehend the consequences of deleting a company from QuickBooks. This includes considering the impact on financial reporting, tax filings, historical records, and any integrations with other systems.
Alternatives To Deleting A Company
Instead of permanently deleting a company from QuickBooks, there are alternative options you can consider. These alternatives allow you to preserve your data while still managing your accounts effectively. In this article, we will discuss two common alternatives to deleting a company: archiving the company file and creating a new company.
Archiving The Company File
Archiving the company file is an effective way to remove a company from your active QuickBooks dashboard without permanently deleting it. This option allows you to retain your company data for future reference, while freeing up space and reducing clutter in your QuickBooks interface.
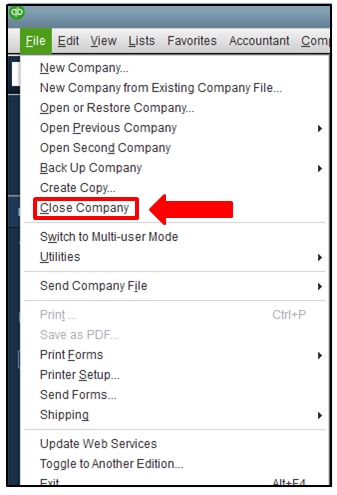
To archive a company file, follow these simple steps:
- Open QuickBooks and log in to your desired company file.
- Click on the “File” menu at the top left corner of the screen.
- Select the “Close Company/Logoff” option.
- On the pop-up window, click on the “Archive” button.
- Choose the location where you want to save the archived file and click “OK”.
Once the archiving process is complete, you will see a .QBW file saved in the designated location. Archived files can be easily accessed whenever you need to refer back to your old company data.
Creating A New Company
If you no longer require the existing company but still want to keep the data separate, creating a new company is a great option. This allows you to start fresh with a new set of books while retaining access to your previous company’s data whenever necessary.
To create a new company in QuickBooks, follow these steps:
- Open QuickBooks and sign in to your account.
- Click on the “File” menu at the top left corner of the screen.
- Select “New Company” from the drop-down menu.
- Follow the prompts to set up your new company’s information.
- Once the new company is created, you can switch between the different companies by going to the “File” menu and selecting the desired company.
This way, you can have multiple companies in QuickBooks, each with its own set of books, transactions, and financial data.
By considering these alternatives, you can effectively manage your QuickBooks accounts without permanently deleting a company. Whether you choose to archive your company file or create a new company, these options ensure that your data is safe and accessible whenever you need it.

Credit: quickbooks.intuit.com
Frequently Asked Questions On How To Delete A Company From Quickbooks
How Do I Remove A Company In Quickbooks?
To remove a company in QuickBooks, go to the Company menu, select “Close Company/Logoff,” then choose the company file you want to remove and click “Close Company. ” Confirm by clicking “Yes. “
How Do I Delete A Company From Quickbooks And Start Over?
To delete a company in QuickBooks, go to Company menu, select “Close Company/Log Off. ” Reopen QuickBooks, click “New Company,” and start over.
How Do I Remove An Accounting Firm From Quickbooks?
To remove an accounting firm from QuickBooks, go to “Company” menu, select “Manage Users,” locate the firm, and click “Delete. “
How Do I Close A Business In Quickbooks?
To close a business in QuickBooks, log in to the account, go to the “Company” menu, select “Planning & Taxes,” and choose “Close Company. ” Follow the prompts to complete the process and close the business in QuickBooks.
Conclusion
Deleting a company from Quickbooks is a manageable task with the right guidance. By following the outlined steps, you can easily remove a company from Quickbooks and streamline your accounting process. Ensure to carefully review the instructions to avoid any potential data loss during the process.
Thank you for reading!